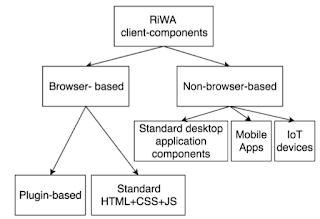
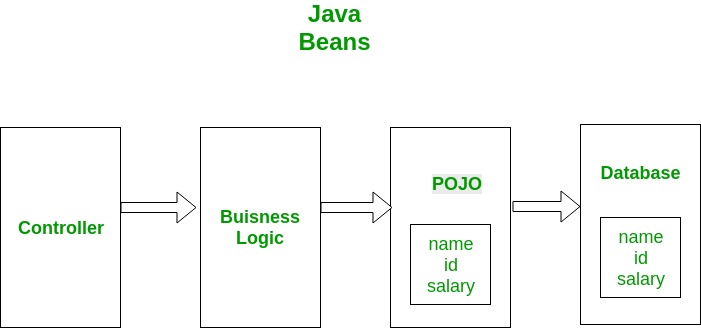
Main elements of client-side application components of distributed systems
Distributed systems use client-side elementsfor users to interact withThese client-side elements include
•Views – what users see (mainly GUI s) •Controllers – contain event handlers for the Views •Client-model – Business logic and data
Views development technologies for the browser-based client-components of web-based applications
• Browser-based clients’ Views comprises two main elements
• Server/client-side components may generate the elements of Views
• Formatting – CSS
• Content – HTML
Different categories of elements in HTML
Structural elements
• header, footer, nav, aside, article
Text elements
• Headings – <h1> to <h6>
• Paragraph – <p>
• Line break – <br>
Images
Hyperlinks
Data representational elements (these elements use nested structures)
• Lists
• Tables
Form elements
• Input
• Radio buttons, check boxes
• Buttons
CSS (Cascading Style Sheets) Used to
• Decorate / Format content
Advantages (importance)
• Reduce HTML formatting tags
• Easy modification
• Save lot of work and time
• Faster loading
There are 3 main selectors
•Element selector
•ID selector
•Class selector
Importance of CSS
Cascading Style Sheets, commonly known as CSS, is an integral part of the modern web development process. It is a highly effective HTML tool that provides easy control over layout and presentation of website pages by separating content from design.
Although CSS was introduced in 1996, it gained mainstream popularity by the early 2000s when popular browsers started supporting its advanced features. The latest version, CSS3, has been available since 1998 and was last updated in September 2008.
CSS3 (New Feature)
CSS3 is the latest evolution of the Cascading Style Sheets language and aims at extending CSS2.1. It brings a lot of long-awaited novelties, like rounded corners, shadows, gradients, transitions or animations, as well as new layouts like multi-columns, flexible box or grid layouts.Experimental parts are vendor-prefixed and should either be avoided in production environments, or used with extreme caution as both their syntax and semantics can change in the future.
Benefits of CSS in web development
Improves Website Presentation
The standout advantage of CSS is the added design flexibility and interactivity it brings to web development. Developers have greater control over the layout allowing them to make precise section-wise changes.As customization through CSS is much easier than plain HTML, web developers are able to create different looks for each page. Complex websites with uniquely presented pages are feasible thanks to CSS.
Makes Updates Easier and Smoother
CSS works by creating rules. These rules are simultaneously applied to multiple elements within the site. Eliminating the repetitive coding style of HTML makes development work faster and less monotonous. Errors are also reduced considerably.Since the content is completely separated from the design, changes across the website can be implemented all at once. This reduces delivery times and costs of future edits.
Helps Web Pages Load Faster
Improved website loading is an underrated yet important benefit of CSS. Browsers download the CSS rules once and cache them for loading all the pages of a website. It makes browsing the website faster and enhances the overall user experience.This feature comes in handy in making websites work smoothly at lower internet speeds. Accessibility on low end devices also improves with better loading speeds.
3 Main types of CSS selectors
The element selector selects elements based on the element name.You can select all <p> elements on a page like this (in this case, all <p> elements will be center-aligned, with a red text color)
Example
p {
text-align: center;
color: red;}Try it Yourself »
THE ID SELECTOR
The id selector uses the id attribute of an HTML element to select a specific element.The id of an element should be unique within a page, so the id selector is used to select one unique element!To select an element with a specific id, write a hash (#) character, followed by the id of the element.The style rule below will be applied to the HTML element with id=”para1″:
Example
#para1 {
text-align: center;
color: red;}Try it Yourself »
Note: An id name cannot start with a number!
THE CLASS SELECTOR
The class selector selects elements with a specific class attribute.To select elements with a specific class, write a period (.) character, followed by the name of the class.In the example below, all HTML elements with class=”center” will be red and center-aligned:
Example
.center {
text-align: center;
color: red;}Try it Yourself »
You can also specify that only specific HTML elements should be affected by a class.In the example below, only <p> elements with class=”center” will be center-aligned:
Example
p.center {
text-align: center;
color: red;}Try it Yourself »
HTML elements can also refer to more than one class.In the example below, the <p> element will be styled according to class=”center” and to class=”large”:
Example
<p class=”center large”>This paragraph refers to two classes.</p>Try it Yourself
Note: A class name cannot start with a number!
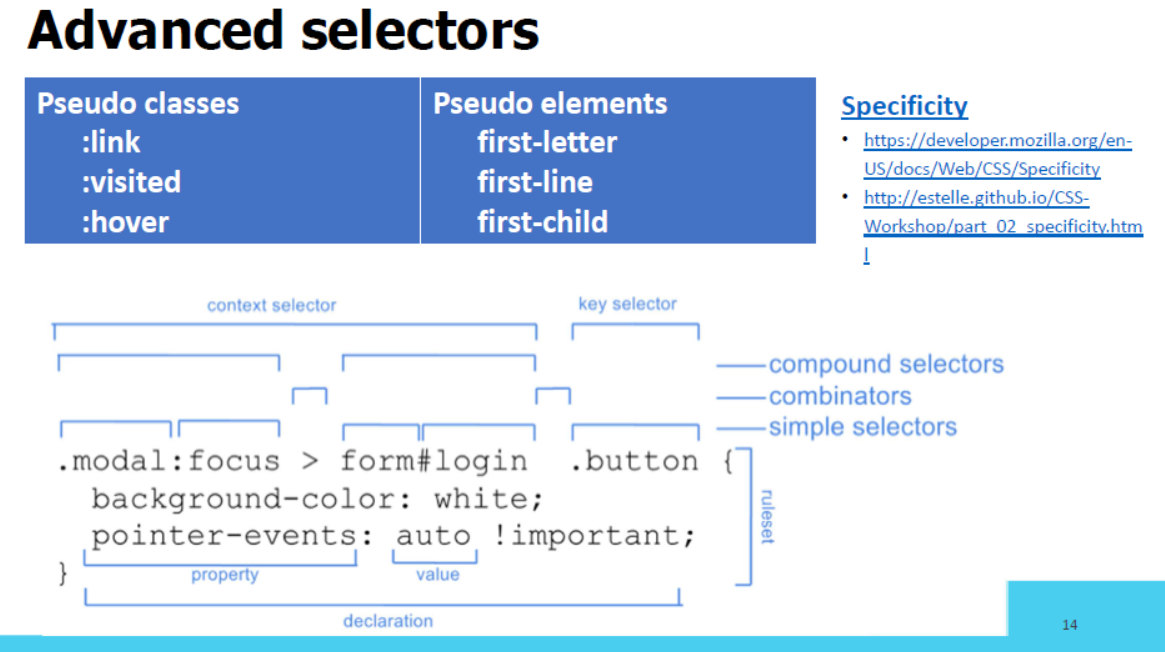
Advanced CSS selectors
Selectors are used for selecting the HTML elements in the attributes. Some different types of selectors are given below:
1.Adjacent Sibling Selector: It selects all the elements that are adjacent siblings of specified elements. It selects the second element if it immediately follows the first element.
2.Attribute Selector: It selects a particular type of inputs.
3.nth-of-type Selector: It selects an element from its position and types.
4.Direct Child Selector: It selects any element matching the second element that is a direct child of an element matching the first element. The element matched by the second selector must be the immediate children of the elements matched by the first selector.
5.General Sibling Selector: It selects only the first element if it follows the first element and both children are of the same parent element. It is not necessary that the second element immediately follows the first element.
Use for CSS media queries in responsive web development
By targeting the browser width, we can style content to look appropriate for a wide desktop browser, a medium-sized tablet browser, or a small phone browser. Adjusting the layout of a web page based on the width of the browser is called “responsive design.” Responsive design is made possible by CSS media queries.
In this how to, you’ll learn how to use media queries in responsive design.
- Start with an HTML page and a set of default CSS styles. These styles will be used by the browser no matter what width the browser is.
<pre class="wp-block-syntaxhighlighter-code brush: plain; notranslate"><!DOCTYPE HTML>
<html>
<head>
<meta charset="UTF-8">
<title>Media Queries Example</title>
<meta name="viewport" content="width=device-width, initial-scale=1.0">
<style>
body {
background-color: #ccc;
}
#main {
background-color: #fff;
width: 80%;
margin: 0 auto;
padding: 2em;
}
article {
float: right;
width: 64.6666666%;
padding: 1%;
background-color: #ffaaaa;
}
aside {
float: left;
width: 31.3333333%;
padding: 1%;
background-color: #ffaaff;
}
footer {
clear: both;
}
</style>
</head>
<body>
<div id="main">
<header>
<h1>Media Queries</h1>
</header>
<article>
<h2>Main Content</h2>
<p>This is main content - it shows on right on desktops, on bottom on phones</p>
<p>This is main content - it shows on right on desktops, on bottom on phones</p>
<p>This is main content - it shows on right on desktops, on bottom on phones</p>
<p>This is main content - it shows on right on desktops, on bottom on phones</p>
<p>This is main content - it shows on right on desktops, on bottom on phones</p>
</article>
<aside>
<h2>Sidebar Content</h2>
<p>This is sidebar content - it shows on left on desktops, on bottom on phones</p>
<p>This is sidebar content - it shows on left on desktops, on bottom on phones</p>
<p>This is sidebar content - it shows on left on desktops, on bottom on phones</p>
</aside>
<footer>
<p>This is the footer - it shows only on desktops</p>
</footer>
</div>
</body>
</html>
</pre>
2. After the footer styles, write the following media query. This will apply the CSS within it whenever the browser width is less than or equal to 700px.
@media screen and (max-width: 700px) {
}
3. Between the curly braces of the media query, you can override the default styles to change the layout of the page for smaller browsers, like this:
@media screen and (max-width: 700px) {
 article {
  float: none;
  width: 98%;
  padding: 1%;
  background-color: #ffaaaa;
 }
 aside {
  float: none;
  width: 98%;
  padding: 1%;
  background-color: #ffaaff;
 }
 footer {
  display: none;
 }
}
4. Open the HTML page in a browser. This code renders the following, if your browser window is greater than 700px wide:
5. Drag the right edge of your web browser to make it narrower. When the width of the browser gets to 700px or less, the layout will change to the following:
Pros and cons of 3 ways of using CSS (INLINE,INTERNAL, EXTERNAL)
OPTION 1 – INTERNAL CSS
Internal CSS code is put in the <head> section of a particular page. The classes and IDs can be used to refer to the CSS code, but they are only active on that particular page. CSS styles embedded this way are downloaded each time the page loads so it may increase loading speed. However, there are some cases when using internal stylesheet is useful. One example would be sending someone a page template – as everything is in one page, it is a lot easier to see a preview. Internal CSS is put in between <style></style> tags. An example of internal stylesheet:
<head>
  <style type="text/css">
    p {color:white; font-size: 10px;}
    .center {display: block; margin: 0 auto;}
    #button-go, #button-back {border: solid 1px black;}
  </style>
</head>
Advantages of Internal CSS:
- Only one page is affected by stylesheet.
- Classes and IDs can be used by internal stylesheet.
- There is no need to upload multiple files. HTML and CSS can be in the same file.
Disadvantages of Internal CSS:
- Increased page loading time.
- It affects only one page – not useful if you want to use the same CSS on multiple documents.
How to add Internal CSS to HTML page
Open your HTML page with any text editor. If the page is already uploaded to your hosting account, you can use a text editor provided by your hosting. If you have an HTML document on your computer, you can use any text editor to edit it and then re-upload the file to your hosting account using FTP client.
Locate <head> opening tag and add the following code just after it:
<style type="text/css">
Now jump to a new line and add CSS rules, for example:
body { background-color: blue; } h1 { color: red; padding: 60px; }
Once you are done adding CSS rules, add the closing style tag:
</style>
At the end, HTML document with internal stylesheet should look like this:
<!DOCTYPE html>
<html>
<head>
<style>
body {
    background-color: blue;
}
h1 {
    color: red;
    padding: 60px;
}
</style>
</head>
<body>

<h1>Hostinger Tutorials</h1>
<p>This is our paragraph.</p>

</body>
</html>
OPTION 2 – EXTERNAL CSS
Probably the most convenient way to add CSS to your website, is to link it to an external .css file. That way any changes you made to an external CSS file will be reflected on your website globally. A reference to an external CSS file is put in the <head> section of the page:
<head>
  <link rel="stylesheet" type="text/css" href="style.css" />
</head>
while the style.css contains all the style rules. For example:
.xleftcol {
   float: left;
   width: 33%;
   background:#809900;
}
.xmiddlecol {
   float: left;
   width: 34%;
   background:#eff2df;
}
Advantages of External CSS:
- Smaller size of HTML pages and cleaner structure.
- Faster loading speed.
- Same .css file can be used on multiple pages.
Disadvantages of External CSS:
- Until external CSS is loaded, the page may not be rendered correctly.
OPTION 3 – INLINE CSS
Inline CSS is used for a specific HTML tag. <style> attribute is used to style a particular HTML tag. Using CSS this way is not recommended, as each HTML tag needs to be styled individually. Managing your website may become too hard if you only use inline CSS. However, it can be useful in some situations. For example, in cases when you don’t have an access to CSS files or need to apply style for a single element only. An example of HTML page with inline CSS would look like this:
<!DOCTYPE html>
<html>
<body style="background-color:black;">

<h1 style="color:white;padding:30px;">Hostinger Tutorials</h1>
<p style="color:white;">Something usefull here.</p>

</body>
</html>
Advantages of Inline CSS:
- Useful if you want to test and preview changes.
- Useful for quick-fixes.
- Lower HTTP requests.
Disadvantages of Inline CSS:
- Inline CSS must be applied to every element.
NEW FEATURES IN JS VERSION 6
There are three major categories of features:
- Better syntax for features that already exist (e.g. via libraries). For example:
- New functionality in the standard library. For example:
- Completely new features. For example:
30.2 New number and Math features
30.2.1 New integer literals
You can now specify integers in binary and octal notation:
> 0xFF // ES5: hexadecimal
255
> 0b11 // ES6: binary
3
> 0o10 // ES6: octal
8
30.2.2 New Number properties
The global object Number gained a few new properties:
Number.EPSILON for comparing floating point numbers with a tolerance for rounding errors.Number.isInteger(num) checks whether num is an integer (a number without a decimal fraction): > Number.isInteger(1.05)
false
> Number.isInteger(1)
true
> Number.isInteger(-3.1)
false
> Number.isInteger(-3)
true
- A method and constants for determining whether a JavaScript integer is safe(within the signed 53 bit range in which there is no loss of precision):
Number.isSafeInteger(number)Number.MIN_SAFE_INTEGERNumber.MAX_SAFE_INTEGER
Number.isNaN(num) checks whether num is the value NaN. In contrast to the global function isNaN(), it doesn’t coerce its argument to a number and is therefore safer for non-numbers: > isNaN(‘???’)
true
> Number.isNaN(‘???’)
false
- Three additional methods of
Number are mostly equivalent to the global functions with the same names: Number.isFinite, Number.parseFloat, Number.parseInt.
30.2.3 New Math methods
The global object Math has new methods for numerical, trigonometric and bitwise operations. Let’s look at four examples.Math.sign() returns the sign of a number:
> Math.sign(-8)
-1
> Math.sign(0)
0
> Math.sign(3)
1
Math.trunc() removes the decimal fraction of a number:
> Math.trunc(3.1)
3
> Math.trunc(3.9)
3
> Math.trunc(-3.1)
-3
> Math.trunc(-3.9)
-3
Math.log10() computes the logarithm to base 10:
> Math.log10(100)
2
Math.hypot() Computes the square root of the sum of the squares of its arguments (Pythagoras’ theorem):
> Math.hypot(3, 4)
5
30.3 New string features
New string methods:
> 'hello'.startsWith('hell')
true
> 'hello'.endsWith('ello')
true
> 'hello'.includes('ell')
true
> 'doo '.repeat(3)
'doo doo doo '
ES6 has a new kind of string literal, the template literal:
// String interpolation via template literals (in backticks)
const first = 'Jane';
const last = 'Doe';
console.log(`Hello ${first}${last}!`);
    // Hello Jane Doe!

// Template literals also let you create strings with multiple lines
const multiLine = `
This is
a string
with multiple
lines`;
30.4 Symbols
Symbols are a new primitive type in ECMAScript 6. They are created via a factory function:
const mySymbol = Symbol('mySymbol');
Every time you call the factory function, a new and unique symbol is created. The optional parameter is a descriptive string that is shown when printing the symbol (it has no other purpose):
> mySymbol
Symbol(mySymbol)
30.4.1 Use case 1: unique property keys
Symbols are mainly used as unique property keys – a symbol never clashes with any other property key (symbol or string). For example, you can make an object iterable (usable via the for-of loop and other language mechanisms), by using the symbol stored in Symbol.iterator as the key of a method (more information on iterables is given in the chapter on iteration):
const iterableObject = {
    [Symbol.iterator]() { // (A)
        ···
    }
}
for (const x of iterableObject) {
    console.log(x);
}
// Output:
// hello
// world
In line A, a symbol is used as the key of the method. This unique marker makes the object iterable and enables us to use the for-of loop.
30.4.2 Use case 2: constants representing concepts
In ECMAScript 5, you may have used strings to represent concepts such as colors. In ES6, you can use symbols and be sure that they are always unique:
const COLOR_RED    = Symbol('Red');
const COLOR_ORANGE = Symbol('Orange');
const COLOR_YELLOW = Symbol('Yellow');
const COLOR_GREEN  = Symbol('Green');
const COLOR_BLUE   = Symbol('Blue');
const COLOR_VIOLET = Symbol('Violet');

function getComplement(color) {
    switch (color) {
        case COLOR_RED:
            return COLOR_GREEN;
        case COLOR_ORANGE:
            return COLOR_BLUE;
        case COLOR_YELLOW:
            return COLOR_VIOLET;
        case COLOR_GREEN:
            return COLOR_RED;
        case COLOR_BLUE:
            return COLOR_ORANGE;
        case COLOR_VIOLET:
            return COLOR_YELLOW;
        default:
            throw new Exception('Unknown color: '+color);
    }
}
Every time you call Symbol('Red'), a new symbol is created. Therefore, COLOR_RED can never be mistaken for another value. That would be different if it were the string 'Red'.
30.4.3 Pitfall: you can’t coerce symbols to strings
Coercing (implicitly converting) symbols to strings throws exceptions:
const sym = Symbol('desc');

const str1 = '' + sym; // TypeError
const str2 = `${sym}`; // TypeError
The only solution is to convert explicitly:
const str2 = String(sym); // 'Symbol(desc)'
const str3 = sym.toString(); // 'Symbol(desc)'
Forbidding coercion prevents some errors, but also makes working with symbols more complicated.
The following operations are aware of symbols as property keys:
Reflect.ownKeys()- Property access via
[] Object.assign()
The following operations ignore symbols as property keys:
Object.keys()Object.getOwnPropertyNames()for-in loop
30.5 Template literals
ES6 has two new kinds of literals: template literals and tagged template literals. These two literals have similar names and look similar, but they are quite different. It is therefore important to distinguish:
- Template literals (code): multi-line string literals that support interpolation
- Tagged template literals (code): function calls
- Web templates (data): HTML with blanks to be filled in
Template literals are string literals that can stretch across multiple lines and include interpolated expressions (inserted via ${···}):
const firstName = 'Jane';
console.log(`Hello ${firstName}!
How are you
today?`);

// Output:
// Hello Jane!
// How are you
// today?
Tagged template literals (short: tagged templates) are created by mentioning a function before a template literal:
> String.raw`A \tagged\ template`
'A \\tagged\\ template'
Tagged templates are function calls. In the previous example, the method String.rawis called to produce the result of the tagged template.
30.6 Variables and scoping
ES6 provides two new ways of declaring variables: let and const, which mostly replace the ES5 way of declaring variables, var.
30.6.1 let
let works similarly to var, but the variable it declares is block-scoped, it only exists within the current block. var is function-scoped.In the following code, you can see that the let-declared variable tmp only exists inside the block that starts in line A:
function order(x, y) {
    if (x > y) { // (A)
        let tmp = x;
        x = y;
        y = tmp;
    }
    console.log(tmp===x); // ReferenceError: tmp is not defined
    return [x, y];
}
30.6.2 const
const works like let, but the variable you declare must be immediately initialized, with a value that can’t be changed afterwards.
const foo;
    // SyntaxError: missing = in const declaration

const bar = 123;
bar = 456;
    // TypeError: `bar` is read-only
Since for-of creates one binding (storage space for a variable) per loop iteration, it is OK to const-declare the loop variable:
for (const x of ['a', 'b']) {
    console.log(x);
}
// Output:
// a
// b
30.6.3 Ways of declaring variables
The following table gives an overview of six ways in which variables can be declared in ES6 (inspired by a table by kangax):
| Hoisting | Scope | Creates global properties |
|---|
var | Declaration | Function | Yes |
let | Temporal dead zone | Block | No |
const | Temporal dead zone | Block | No |
function | Complete | Block | Yes |
class | No | Block | No |
import | Complete | Module-global | No |
30.7 Destructuring
Destructuring is a convenient way of extracting multiple values from data stored in (possibly nested) objects and Arrays. It can be used in locations that receive data (such as the left-hand side of an assignment). How to extract the values is specified via patterns (read on for examples).
30.7.1 Object destructuring
Destructuring objects:
const obj = { first: 'Jane', last: 'Doe' };
const {first: f, last: l} = obj;
    // f = 'Jane'; l = 'Doe'

// {prop} is short for {prop: prop}
const {first, last} = obj;
    // first = 'Jane'; last = 'Doe'
Destructuring helps with processing return values:
const obj = { foo: 123 };

const {writable, configurable} =
    Object.getOwnPropertyDescriptor(obj, 'foo');

console.log(writable, configurable); // true true
30.7.2 Array destructuring
Array destructuring (works for all iterable values):
const iterable = ['a', 'b'];
const [x, y] = iterable;
    // x = 'a'; y = 'b'
Destructuring helps with processing return values:
const [all, year, month, day] =
    /^(\d\d\d\d)-(\d\d)-(\d\d)$/
    .exec('2999-12-31');
30.7.3 Where can destructuring be used?
Destructuring can be used in the following locations (I’m showing Array patterns to demonstrate; object patterns work just as well):
// Variable declarations:
const [x] = ['a'];
let [x] = ['a'];
var [x] = ['a'];

// Assignments:
[x] = ['a'];

// Parameter definitions:
function f([x]) { ··· }
f(['a']);
You can also destructure in a for-of loop:
const arr = ['a', 'b'];
for (const [index, element] of arr.entries()) {
    console.log(index, element);
}
// Output:
// 0 a
// 1 b
30.8 Parameter handling
Parameter handling has been significantly upgraded in ECMAScript 6. It now supports parameter default values, rest parameters (varargs) and destructuring.Additionally, the spread operator helps with function/method/constructor calls and Array literals.
30.8.1 Default parameter values
A default parameter value is specified for a parameter via an equals sign (=). If a caller doesn’t provide a value for the parameter, the default value is used. In the following example, the default parameter value of y is 0:
function func(x, y=0) {
    return [x, y];
}
func(1, 2); // [1, 2]
func(1); // [1, 0]
func(); // [undefined, 0]
30.8.2 Rest parameters
If you prefix a parameter name with the rest operator (...), that parameter receives all remaining parameters via an Array:
function format(pattern, ...params) {
    return {pattern, params};
}
format(1, 2, 3);
    // { pattern: 1, params: [ 2, 3 ] }
format();
    // { pattern: undefined, params: [] }
30.8.3 Named parameters via destructuring
You can simulate named parameters if you destructure with an object pattern in the parameter list:
function selectEntries({ start=0, end=-1, step=1 } = {}) { // (A)
    // The object pattern is an abbreviation of:
    // { start: start=0, end: end=-1, step: step=1 }

    // Use the variables `start`, `end` and `step` here
    ···
}

selectEntries({ start: 10, end: 30, step: 2 });
selectEntries({ step: 3 });
selectEntries({});
selectEntries();
The = {} in line A enables you to call selectEntries() without paramters.
30.8.4 Spread operator (...)
In function and constructor calls, the spread operator turns iterable values into arguments:
> Math.max(-1, 5, 11, 3)11
> Math.max(...[-1, 5, 11, 3])
11
> Math.max(-1, ...[-5, 11], 3)
11
In Array literals, the spread operator turns iterable values into Array elements:
> [1, ...[2,3], 4]
[1, 2, 3, 4]
30.9 Callable entities in ECMAScript 6
In ES5, a single construct, the (traditional) function, played three roles:
- Real (non-method) function
- Method
- Constructor
In ES6, there is more specialization. The three duties are now handled as follows. As far as function definitions and class definitions are concerned, a definition is either a declaration or an expression.
- Real (non-method) function:
- Arrow functions (only have an expression form)
- Traditional functions (created via function definitions)
- Generator functions (created via generator function definitions)
- Method:
- Methods (created by method definitions in object literals and class definitions)
- Generator methods (created by generator method definitions in object literals and class definitions)
- Constructor:
- Classes (created via class definitions)
Especially for callbacks, arrow functions are handy, because they don’t shadow the this of the surrounding scope.For longer callbacks and stand-alone functions, traditional functions can be OK. Some APIs use this as an implicit parameter. In that case, you have no choice but to use traditional functions.Note that I distinguish:
- The entities: e.g. traditional functions
- The syntax that creates the entities: e.g. function definitions
Even though their behaviors differ (as explained later), all of these entities are functions. For example:
> typeof (() => {}) // arrow function
'function'
> typeof function* () {} // generator function
'function'
> typeof class {} // class
'function'
30.10 Arrow functions
There are two benefits to arrow functions.First, they are less verbose than traditional function expressions:
const arr = [1, 2, 3];
const squares = arr.map(x => x * x);

// Traditional function expression:
const squares = arr.map(function (x) { return x * x });
Second, their this is picked up from surroundings (lexical). Therefore, you don’t need bind() or that = this, anymore.
function UiComponent() {
    const button = document.getElementById('myButton');
    button.addEventListener('click', () => {
        console.log('CLICK');
        this.handleClick(); // lexical `this`
    });
}
The following variables are all lexical inside arrow functions:
argumentssuperthisnew.target
REFERENCES
http://www.plasmacomp.com/blogs/importance-of-css-in-web-development
https://developer.mozilla.org/en-US/docs/Web/CSS/CSS3
https://www.geeksforgeeks.org/advanced-selectors-in-css/
https://www.wikipedia.org/